Feeds:
Posts
Comments

I had an opportunity to conduct several training sessions on Adobe Captivate. For these sessions I created a systematic training plan and developed training material for the employees (lateral hires and new joiners). I enjoyed addressing queries of the team members, providing hands-on training on developing Captivate projects (software demonstrations, simulations, marketing videos, and interactive videos), giving assignments and providing feedback, and making the resources productive in a short span of time.

While training them on the live projects, I also shared some tips and tricks which I think are hardly listed anywhere and can be learnt on the job. Through this blog, I would like to share some tips that will help you improve the quality of your project.

Here are some tips:

  • Sometimes while recording the screens and actions, the application shows up tool tips, screen loading messages, and Java script messages. To eliminate them in the video, capture an additional screen and manipulate the clicks and actions on that screen. For capturing that extra screen, while recording press the Print Screen key on the keyboard.
  • Before recording, decide the flow first and determine the actions that you are going to perform in the application. You can write down the flow in a word document or in your note pad and keep referring to that. This will ensure that the whole flow is captured in one go and there is no scope for consistency errors. By this way you can also avoid rework.
  • Adjust the display time for mouse action consistently in the project (for all the slides). For example, if you set the display time for mouse to 1 second, maintain the same display time throughout the project.
  • You can adjust the display time for typing action after recording hence while recording the typing action; do not worry about the time. You can take your own time to complete the typing action while recording and later on after you end the recording; you can always revisit the typing action and amend its display time in the timeline.

In the next post, I will come up with some more tips and FAQs.
When you want to compile several small captivate demos or modules of a course-ware in to one project, you can use Aggregator. If you do not use Aggregator and copy slides from one project (.cptx file) and paste them into another one, the number of slides increase. This will create a heavy cptx file. Large captivate projects take longer time to publish. The published files also have a bigger file size and it is difficult to share or download those files. If you use Aggregator, you don’t need to assemble the slides or objects into one project. You can publish individual projects as SWF and combine those output files through Aggregator. After you combine these SWF files, you can publish the compiled file as EXE, SWF, HTML, and PDF. While compiling, you can arrange the SWF files in the order in which you want to display them to the user.

To create an aggregator project:

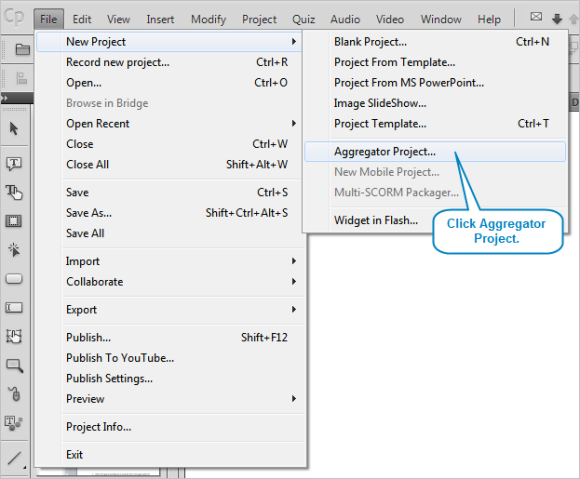
1.       On the File menu, click New Project, and then click Aggregator Project….

Image

Figure 1: Aggregator Project

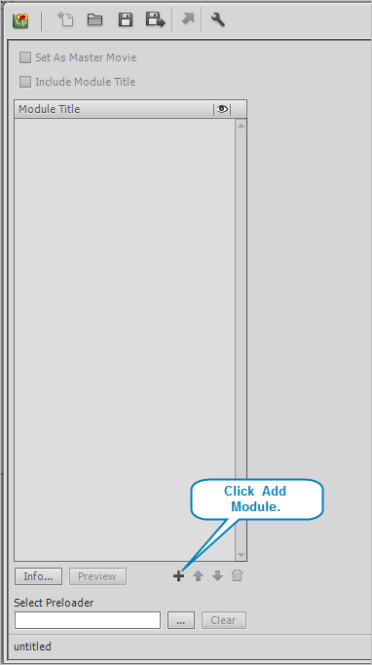
The Adobe Captivate Aggregator dialog box appears.

Image

Figure 2: Adobe Captivate Aggregator dialog box

2.       Click the Add Module icon.

3.       Browse to the location where you have saved the SWF file that you want to add to the aggregator.

4.       Click Open.

The SWF file is added to the aggregator.

Figure 3: Adding SWF files to the Aggregator

Note:

  • To add more SWF files to the aggregator, repeat step 2 to 4.
  • To change the order of the SWF files, use the arrow icons.
  • To preview the SWF file in the right pane, click Preview.
  • To view and edit the TOC information click Info….
  • To hide the title of the SWF file in the output, clear the Include Movie Title check box.
  • To set a particular SWF file as a master movie:

1. Click he SWF file that you want to set as a master movie.

2. Select the Set As Master Movie check box.

The SWF file is set as a master movie.

Note: when you set an SWF file as a master movie, the project settings and TOC settings of that SWF file are applied to the remaining files in the aggregator.

5.       To save the aggregator project, click the Save Aggregator Project icon .

6.       To publish the aggregator project, click the Publish Aggregator Project icon.

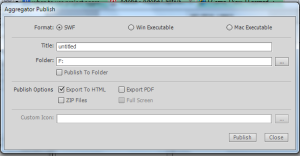
The Aggregator Publish dialog box appears.

agr-publish

Figure 4: Aggregator Publish dialog box

7.       In the Format area, click the format in which you want to publish the file.

Note: If you click Win Executable or Mac Executable, you can provide a custom icon for the published EXE file.

8.       In the Title box, type the name for the project.

9.       Browse to the folder where you want to publish the output file.

Note: If you want to publish the project to a folder, select the Publish To Folder check box.

10.   In the Publish Options area, select the appropriate check boxes.

11.   To publish the aggregator project, click Publish.

The aggregator project is published in the specified format.

Using styles, you can maintain the consistency in your Captivate project. Captivate 5.5 has come up with a new feature called Properties panel. Through this panel, you can create various styles such as text caption style, highlight box style, failure caption style, success caption style, hint caption style and so on. You can set the style preferences before capturing or recording the application. However if you do not set the style preference before capturing, you can do it while editing your captivate project. You can edit the styles through Object Style Manager, or you can create new styles through Properties panel, and apply the new style to all the objects that have the default capture style.

For example, you want to create a new style for text caption, and want to apply it to all the text captions at one go, how will you do that? Here are some quick steps:

To create a new text caption style and apply the new style to all the existing text captions:

1. Select the existing text caption.

The Properties panel at the right side displays the properties of the selected text caption.

Note: The Properties panel is context sensitive. It displays the properties of the selected object. If you can’t see the Properties panel, in the Windows menu, select the Properties option.


2. In the Properties panel, you can specify the preferred formatting such as caption type, callout type, font type, size, color, alignment, indentation, line spacing, and display duration and transition effects.
3. Once you modify the text caption with preferred styles, click the Create New Style icon below the Style drop down option.


The Save New Object Style window appears.

4. Type the style name and click Ok.

The new style is created.

5. To apply this new style to all the text captions present in the project, click the Apply this style to icon.


The Apply Object Style window appears.


6. From the dropdown options, just click the previously applied style, and then click OK.
The new text caption style is applied to all the text captions.

This way you can create styles for highlight box as well. Also, if you do not want to create a new text caption style and just want to save the modifications, you can click the Save icon.
Note: You can edit the styles through Object Style Manager and Preferences features present in the Edit menu.

Here are some reference links through which you can explore these features in detail.

http://www.adobe.com/feature/captivate/object-styles.modaldisplay.4._s_content_s_dotcom_s_en_s_products_s_captivate_s_features.html
http://help.adobe.com/en_US/captivate/cp/using/WS3d71e636065aa5be-17a34970126adee4348-7fff.html

According to the requirements of the project, we set the resolution for the videos. For example the resolution of your project is 800 X 600.  However when you add a Table of Contents (TOC) to this project, it will occupy additional space of your project. To resolve this difficulty, you can overlay the TOC. By this way you are offering a TOC with your project and that too without consuming an additional space. This TOC will be visible after you click the forward arrows at the upper left corner.

Overlapping Table of contents in Captivate 5.5 and Captivate 4

1.       On the Project menu click Table of Contents.

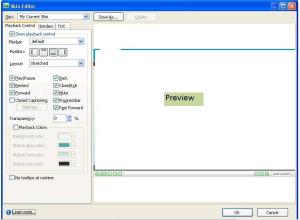
The SKIN EDITOR dialogue box appears.

2.       Select the Show TOC checkbox.

3.       Click the Settings button at the lower left corner.

The TOC Settings dialogue box appears.

4.       In the Styles area, click Overlay.

5.       Click Ok. You can also adjust the position of the TOC to the left or right side through the Position option.

While creating an online help for any product or application, sometimes clients insist on placing their logo in the help output as well.

In RoboHelp 8, we can use ‘skins’ for changing the appearance of the WebHelp. The changes will be applied to the left side of the window and the toolbar. We can customize this layout according to our preferences for buttons, fonts, colors, and so on. We can also add different backgrounds and logos.

If you want to display the logo of the product or application for which you are developing an online help, on the help output:
1. On the View menu, click Pods and then click Project Set-up.
2. In the Project Set-up pod, right click the skin and then click Edit.
The WebHelp Skin Editor dialogue box appears.
3. In the Toolbar area, click the plus icon.
The Custom Toolbar Item dialogue box appears.
4. Enter the details and from the Image area, click Custom. Browse to select the image of the logo which you want to display in the online help.
5. Click OK.
6. To look at the preview, click the Preview button at the lower left corner.
The logo of the application or product is displayed in the help output.

In short: Go to Project Set-up. – Right click the skin. -Click Edit.-Click Custom.- Browse to select the image of the logo.- Click OK.

John works in the technical communication and eLearning industry. Currently he is working on a project where he is supposed to develop training videos. He is using Captivate 4.
He is proficient in the tool and sometimes he offers mentoring to his team. That day he came to office and while working with captivate files, he faced a strange issue. He could hear the audio in preview and published mode, but he couldn’t hear the audio in the editing mode.

He was so tensed by this issue, and tried to find a solution for this. Jane noticed his nervous face and asked if she can be of any help. John explained her, what the problem is.

Jane thought for a second and replied, “Hey, you just upgraded your system from windows XP to windows 7! Is it causing compatibility issue?”

John’ face lit with joy and he smirked at Jane.
Here is what John did to solve this.

He researched for the problem, in which we get to hear the audio only in the preview or in the published version and not in the editing view.

He understood that this problem will be solved if you install the updates from: http://www.adobe.com/support/captivate/captivate_4_downloads.html
Download and Install the patch for Adobe Captivate 4 (ZIP, 19 MB).

Once you download it, you will get to hear the audio in all the modes.

I started calling my life a ‘document’
No matter which, user guide or online help
This document is full of review cycles
and vexed by the point of views
so I make it all inclusive

I follow my own style guide
to author my unstructured life
I make a bulleted list of trivial things
and ask my spouse to summarize the points

I force others to use minimal words
and to be to the point
I put the numbered list in the grocery shop
and add checkboxes for the warp

While speaking to children I become context sensitive and
only talk about their studies keeping exams in context
no matter how boring is their Math’s’ text

Sometimes I think managing inbox is easier
than managing home
at least I can dump the unwanted things
alone

In the office, I play Tom and Jerry with the editor
where editor is Jerry to always win the game
leaving me wondered in his terrain
how can I do such silly mistake again?

In my refrigerator there is no frozen content
unless client wants to freeze it
take the unending client calls
and then leave it

I am afraid of FrameMaker,
for me it’s frown maker
I talk about DITA, Robohelp, Camtasia, Captivate, and SnagIt
as, for developers they make no sense
and leave me in solace

Parallelism and serial comma
just to be proud and keep aside the dogma
“Never underestimate the writer”, I yell at the developer
His question mark states that
it’s me to be blamed for feeling inferior

In uncountable scrums and project meetings
I think positive and keep smiling
hoping to understand something someday
and develop the document array

So what makes this document interesting?
On a client call late at night
client gives his good remark in a minute
I fly high in the sky
all set to face the harsh reviews and
suggestions to apply

Once developer said, “writers are not required”
I felt so bad that I didn’t turn up
Next day he called up
some updates to sync up
I stretched the point from user perspective to writer’s significance
Now I get the much awaited respect
there are some awards in my basket

Oh! What am I doing frantically?
Just writing a poem technically……

Technical Writer's Document

Note: Through this poem, I tried to portray the hectic life of Technical Writer in a comic way.
Also read on: http://www.buzzle.com/articles/technical-writers-document-poem.html

I visited a company having a notable turnover. It was recognized worldwide due its novel concepts and products it comes up with every time to create buzz in the market.

I was so curious to visit the employees there. I entered and got shocked to see small kids strolling in the lobby like experienced professionals. I could see through the glass wall, some kids were busy on their computers. After enquiring I got to know that these were the top programmers in the country. I was stunned!

This is not an exaggeration. This can be a situation in the near future. Yes, I am not kidding. Kids are learning complex programming concepts now days. How? There is a tool called Scratch, which lets the user create his own stories, games or animations using an easy programming interface. Scratch itself is a programming language which helps developing important mathematical and computational ideas. At the same time it encourages us to think creatively and reason systematically.

The Scratch IDE (Integrated Development Environment) is amusing. We just have to drag the blocks and drop them into the script area. There are various sprites (Characters/Objects), backgrounds, costumes, sounds and lot more to explore. Kids like to play with it. Most of the parents have a major concern that their kids waste a lot of time in playing computer games. Now kids can create their own computer games and parents will support them as it is also adding up to their kid’s knowledge and creativity.

I was a part of a small venture aiming to create IT awareness in school children and encourage them for developing good competency in basic programming concepts. Teaching Scratch comes under this initiative. I went to different schools and the response and enthusiasm was amazing! Kids are really brilliant. It was amusing to see their reactions, small queries and innovative ideas. They truly are our nation’s bright future.

Visit http://scratch.mit.edu/ for more information and for downloading this free tool.

On our last session at the school, we received a fabulous feedback and remarks. Kids said that they were going to miss us, but in reality, we are going to miss them a lot. We collected their assignments and feedback. But there is one more significant thing that we collected, what was that? While they were busy speaking with each other, we collected and stored the sight of their innocent faces filled with queries, curiosity, zest, and passion to learn, in our eyes forever!

——————————————————————–

Read More links:
1. Scratch is an educational programming language that allows people of any experience background and age to experiment with the concepts of fully versatile computer programming by snapping together visual programming block to control images, music and sound.
Form: http://en.wikipedia.org/wiki/Scratch_(programming_language)
2. Visit (http://scratch.mit.edu/galleries/browse/newest). It is the gallery of Scratch projects where some people around the world have uploaded their Scratch projects.


When you want to capture the demonstration, we use the record option in Captivate.

If you also want to create the assessment mode that is an interactive simulation with prompts and feedback, please refer following steps.

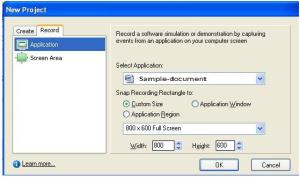
Click File, point to New and then click Project.

Click the Record tab.

Select the application to record.

New Project tab Captivate 4

New Project -Record tab Captivate 4


Select the size of the recording window under Snap Recording Rectangle to.

Click OK.

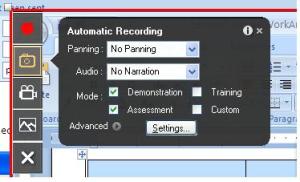
It will show the recording window. Click the automatic recording icon (second one)

Select the desired boxes under Mode option.

Recording Window - Captivate 4

Recording Window - Captivate 4


There are four options, Demonstration, Training, Assessment, and Custom.

You can select Demonstration and Assessment.

Note: This is very important step, you need to specify right here so that captivate is able to create assessment mode that is an interactive simulation with prompts and feedback.

Click the red circle icon (Start Recording button) to start the recording.

Perform the steps that you want to record.

Press End key when you finish the recording.

Save Project files dialogue box appears.

Browse to the location to save your project.

Under Project to Open list click Assessment or Demonstration mode.

If you select the Assessment mode, you will get the success and failure captions that is an interactive simulation with prompts and feedback.

This project is saved on the same location that you have selected but with two different files project title _demo.cp and Project title _ Assessment.cp.

Closed captioning is required for many of the e-Learning projects. While working with captivate we either import the audio file or use the ‘Text to Speech’ option in captivate and complete the closed captioning related to that particular audio.

In spite of adding the closed captions, sometimes we cannot see those in the published output or the preview. So to make them visible, follow the steps mentioned below.

1. Click Projects Menu, and then click Skin Editor….

Skin Editor-Captivate 4

Skin Editor-Captivate 4

2. In the Playback Control tab, select the Closed Captioning check box.
3. If you want to edit the font size and color of the closed caption, click Settings.

Closed Captioning Settings dialogue box appears. Here you can specify the font type, size and color of the closed caption. You can also set the background color, its transparency, and the number of lines to be displayed for the closed caption.

Now you will be able to see the closed captions in the preview or the published file. You have to click the CC button present at the right bottom corner of the screen.

These instructions are applicable if you are using Captivate 4. Hope, in other versions of captivate you can easily find out the options by referring to the above steps.

It is optional to keep the closed captions on as it is meant for the select audience who are hard of hearing. Closed captions help them in understanding the content or the visuals which are played in sync with the voice over.